Thursday, August 31, 2017

Magazine & Gripper Motors, Part 1


When we picked-up the RO in West Virginia I had to prepare it for shipping back to Minnesota....on it's back. And in order to do this, amongst other things I had to remove all of the records. And in order to do that, I knew I had to turn the Magazine Assembly via the Magazine Motor. Simple enough to do, given that there's a spring-loaded/momentary Load Switch inside the cabinet....

Except when I powered-up the unit (with the amplifier disconnected, of course!) and hit this switch, the motor had a pretty hard time turning the carousel! "Ok....", I thought. "I guess I'm going to have to look into rebuilding this motor".

That was 7 years ago.

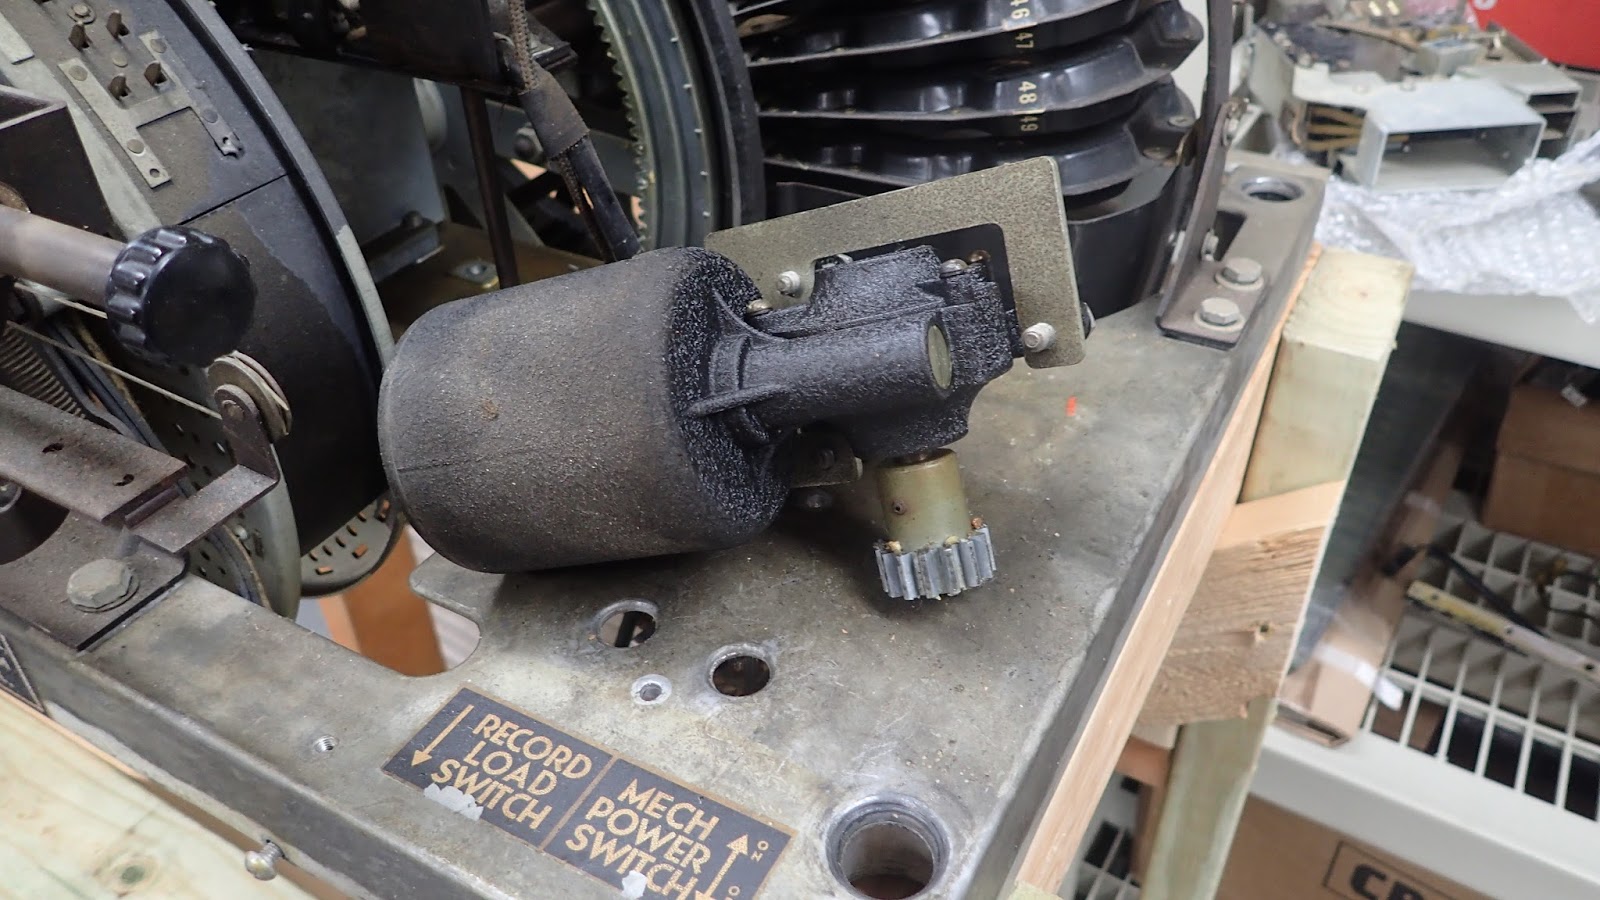
Fast forward to Present Day, and here's that same motor loosened-up and laying on it's side:


And I guess I got a case of the "May As Well's", as I decided this would be the perfect time to remove the Gripper Arm motor and go through it as well:


Thankfully both motors "smelled" ok (not burned), and both gears turned when I rotated the stub of the armature sticking out of the end of the motor, but they didn't turn all that easy, and they felt a little "scratchy", even when turning them slowly.....

Disassembly was pretty straight forward, and nothing broke, thank God! The most important thing to do at this point was to keep everything in order, as I found that some of the parts are not interchangeable between the two assemblies.

Here's an "expanded" (never say "exploded"!) view of the Magazine motor:


The Gripper motor is quite similar, except for some minor differences with shafts and gears.

Once I had both motors disassembled I found all sorts of dried-up, baked-on, caked-on, and just generally nasty-looking grease that had attached itself to anything it could! Cleaning it up from the metal pieces was simple enough, as I could go at it with a sharp pick, a wire brush, and some degreaser, but these plastic gears....Uh-uh! No way!


Since I don't know what the original grease was, and I don't know what chemicals would "craze" the plastic gears, I ended-up cleaning each one by hand, in the laundry tub, with a dental pick, a toothbrush, and Soft Soap! Scrape, wipe, brush, wash. Repeat ad infinitum. Each gear took about an hour to get thoroughly and completely clean, but as you will see in the next post, I was able to get them to "squeaky clean" condition!

And thankfully not one tooth was broken-off from either gear.

The bearings on both ends of both motors had a grinding feel to them, which may help explain some of the difficulties I had turning the magazine motor back in 2010. So, thinking that they were a "standard bearing", and that they could easily be replaced at the local NAPA store, I promptly removed them, paying particular attention to the number and overall thickness of spacers used on the ends of each armature:


It was only after I had the bearings in-hand that I found they weren't a "standard" size after all! Oh, sure! They both had what "looked like" standard bearing numbers, but when I put a micrometer on the smaller of them (the "lower" bearing) and found an inside dimension of 6.35 mm....while every other bearing with the same P/N I could find on the "interwebs" had an ID of 6.00 mm, I figured I was screwed!

Ah! But then I remembered that Jukebox World/Stamann Musikboxen  (http://www.jukebox-world.de/en/home/) offers all sorts of hard-to-find jukebox parts, and if I was ever lucky....

Success! All 4 bearings! I couldn't hit the Purchase button fast enough!

While the bearings were being shipped from Germany I took the armatures over to Schelen-Gray in St. Paul (http://www.grayautoelectric.com/) to have them checked-out. And if everything was ok, I would have them turned.


Thankfully everything turned-out just fine.

The last thing I wanted to do before re-assembly was clean the motor housings thoroughly, both inside and out, as they look all nasty, and I didn't want this crap getting on my new bearings and nice, clean, and newly turned armatures!


Except how did I clean them without getting the windings wet, you ask? The answer to that will have to wait until the next post!


Speaking of Grippers.....


One of the smartest things I've done for this jukebox is to buy as many used and NOS pieces and parts as I've been able to lay my hands on. One of the most "interesting" (and educational) of these purchases has been a used and complete Gripper Unit Assembly (P/N 18813-A) from what I believe was a 1448 that I found on eBay in 2011 which also came with the Micro Switches, the reversing lever switch/rod mechanism, and all associated wiring. The seller claimed the unit wasn't locked-up, which turned out to be untrue, but fortunately I was able to free it up with some 3M Penetrating Lubricant.

I remember as a kid how the gripper arm moved, and I can't describe how happy I was to simulate this once I had freed-up the "spare" gripper assembly! So happy, in fact, that I grabbed my wife and said, "Look at this!" She said it was "Nice...." (you married guys know what I'm talking about).

Anyway, since the gripper mechanism in the actual jukebox was locked-up, my advice to anyone who cares: BUY SPARE PARTS! It's always easier to learn on them than on "the real thing"!

Regardless, even though I forgot to take initial pictures showing wiring and what-not, here are some pictures of the disassembly:

Locked-up tight and very dirty:

Attempting to remove the two shafts at the same time (bad idea!):

Reverse side:


Ok, here I must have had it freed-up enough that I was able to rotate the gripper arm 90 degrees, but the gripper gears are still installed/attached:


Making progress:

Here I found I had to remove the Gripper Arm Reversing Cam to go any further, and in order to do that, I had to remove the reversing rod linkage. Close-up of that assembly:

After removing the Gripper Drive Shaft assembly I was able to lay the unit on it's side and see how the Reversing Bracket Assembly works:

I will admit that it took me a while to figure out how to disassemble the Gripper Arm Reversing Cam from the arm itself, and at first I thought all I had to do was loosen this set screw:

WRONG! Disassembly requires depressing the Inner Gripper Casting, and removing this roll pin:

Which will give you this:

And leave you with this:

A little more 3M "LuberSchlieder" and I was down to this:

I guess my point here is, I could have removed the mechanism from the actual jukebox, but I guess I'd rather learn (and make mistakes) on a "spare" piece so that I don't mess-up the "real" part.

Another added benefit is that I was able to send this gripper arm out for chroming while leaving the original arm still installed!


Chrome! (July 2017)

In early 2016, while the RO was still in it's protective "shipping carton", I started to create a mental list regarding everything I needed to do in order to bring it back to life. One of the major cosmetic issues is the chrome- it's over 60 years old, pitted, stained (yes, stained!), and just plain nasty looking. So, in July of 2016 I attended the MSRA Back To The 50's event at the Minnesota State Fair  (https://msrabacktothe50s.com/), not just to see all of the street rods and what-not, but more importantly to start talking with chroming vendors.

I don't recall how many vendors I spoke with that day in 2016, but sadly within a few weeks I promptly lost all of the business cards I had picked-up!

So, in 2017 my father and I did this again.......except this time I didn't mess-up!

It soon became clear that the best chroming vendor around the Twin Cities area is JR Custom Plating  (http://www.jrcustomplating.com/), and both my father and I were impressed not only with their professionalism and attitude, but also with their reputation within the Street Rod community (yes, we talked to a lot of people about where they had their chrome plating done).

So, done deal!

Back home I began sorting parts, and taking pictures of each. I also produced a spreadsheet calling-out each item, complete with Rock-Ola part number, and where it could be found in the Service Manual. My plan was to give this spreadsheet to JR's, but as it turned-out their inventory tracking was much better than I had anticipated, so it was a moot issue.

Here's an overall picture of most of the pieces and parts I sent out for chroming:


I also asked them look at the perforated grill assembly:


The two locks:


And while we're at it, the tonearm as well:


The Gripper Arm and Inner Gripper Casting were in really good condition (although a little dirty here):


But I dragged them along as well, thinking I'd hate to miss this opportunity to make them as "perfect" as possible!

**********************************************************************

If you're reading this and know that I'm back-dating these posts, you're probably aware that by now (8/31/17) I should have received the pieces back from chroming.

And I have.....

And they are absolutely GORGEOUS!

But as I type, they are all wrapped-up in bubble-wrap and paper, awaiting the day when I can put each of them back into their proper location.

So other than this "teaser" taken the day we went to pick them up, pictures will just have to wait!


Paint! (June, 2017)


When I dropped-off the cabinet for refinishing/rebuilding, I asked Scott if he could recommend someone who could help me out with a few metal items that needed some TLC. He mentioned that a local guy he knew did some sand and media blasting, and thought perhaps he could help me out.

So after dropping-off the cabinet I stopped-by this place, but no joy, as his media blasting would seriously distort the top panel (picture below). However, this guy told me about a local body shop that dabbled in restored gas pumps and the like, and he thought perhaps they could help me out!

And best of all, it was (literally!) "on my way", so I stopped-in at Albertville Body Shop (http://www.albertvillebodyshop.com/), spoke with Pat, and he had all of the correct answers to my questions! So, I left the following pieces with them:

* The top rear panel:


* The front door frame:


* The coin return cup:


* The cash box door and lock washer:


* And one of the nastiest pieces I have, the cash box frame assembly:


**********************************************************************

Since I'm trying to update this blog "after the fact", as it were, I'm going to take this opportunity and bring things up to speed with regards to the painting. With the exception of the front door frame assembly, I have already received all of the pieces...and they look absolutely wonderful!

That nasty cash door frame mentioned above? Here it is now:


Here's the top rear cover (picture is kind bleached-out due to the carpet, sorry):


Here's the coin return cup:


And here is the cash door cover and the washer that goes under the lock:


 Absolutely gorgeous! I couldn't be happier!

I haven't received the front door frame yet (today is 8/31/17) as I'm waiting on them to apply the "French Burled Walnut" decal I dropped-off a few days ago.

Funny story about that: When I first started this restoration in 2010, I purchased a whole slew of OEM and remanufactured parts for it. One of those items was a "water transfer decal" from Victory Glass (http://www.victoryglass.com/ ) which simulates the appearance of Walnut on the front door panel. However, like the entire 1452, the decal sat in storage for 7 years, and guess what? When it came time to apply it, it was all dried-out (go figure!), and the guys at Albertville Auto Body had a helluva time with it! (Sorry, Jamie!) I called Victory Glass to see if they had any newer decals, and was told, "We have a few left from a 2007 order, but most people are using the new vinyl decals, as the old water transfer decals kinda sucked." (Really!) Anyway, I ordered a new vinyl decal, and when it arrived 2 days alter, I immediately took it to the body shop.

Can't wait to see what it looks like when it's done!

Wednesday, August 30, 2017

Disassenbly, Part 3 (January-May, 2017)


So I was sitting in the Barber chair the other day, and I got to talking with Dave, my barber, about the RO. Turns out he knows a furniture restoration guy, and he provided me with contact details! Got home, checked out the website (http://minutemanservices.biz/), and then sent the Scott (the owner) an email, with a couple pictures, asking if he would be interested in working on the RO cabinet.

"Sure", he says. "Bring it by and let's have a look at it!"

Except I didn't have the cabinet completely stripped yet!

So............

Cabinet:

Knowing I needed to find someplace to set the "guts" of the RO, I built a "test stand" for it:


After going through and making sure that all wires were disconnected from cabinet (and taking lots of pictures), with the help of my wife (Yes, I can learn from previous experience!), we lifted the mechanism assembly out the cabinet and set it down here:


It's pretty cool to see this in-person, really!

But still the cabinet is not stripped clean....


So, more bagging & tagging, more pictures (yadda, yadda), until I got down to this:


I stumbled across this little bit of "ugliness" on the lower edge that I had somehow previously missed:


Hopefully Scott,can repair this as well.

I find it very interesting that, in some of the pictures above, the original finish of the side panels can be deduced from where the chrome has covered it for the past 62 years! Look at the top of the panels where it seems to be discolored a bit....

Hopefully Scott can replicate that pattern and color!

Lastly (for now),  the stripped cabinet (with rear panel), the rusty front metal piece from the door, and a small box of parts that need to be painted (more on this next time)


Disassenbly, Part 2 (January-May, 2017)


Yes, I may be publishing things somewhat out of order, but hopefully posting things based on Topic, and not by Date, will make sense. (Since my photos are sorted based on Topic, it makes perfectly good sense to me!)

Moving on....

Door disassembly:

 Well, here's what I have to work with:


The chrome is pitted, the paint is peeling, and the metal underneath is starting to rust. Looks like crap, right? Yeah, but....as they say in the sporting world, "Just wait 'til next year!"

Anywhoooo,  I removed all the "V's", carefully making note of the P/N's, and bagging & tagging everything:


After taking a lot of pictures of all of the screws and miscellaneous brackets ("bracki"?) that hold the door chrome assembly together, I removed both door side castings (w/the requisite bagging & tagging):


Along with the door front casting:


And the key plate:


Apparently I didn't take pictures of these last two items at the time of disassembly, as these pictures were taken solely as "inventory" purposes for re-chroming.

Regardless, that only left the metal frame (make that "rusty" metal frame), and the perforated grille assembly, shown here from the rear:


 I separated these into their component parts and set them aside.

While I was at it, I also took apart what I refer to as the "roller guards". Here is one of them fully assembled:


If you look closely you can see they were a riveted assembly, but I didn't take pictures of the drilling-out process. Too boring (no pun intended)! As I mentioned previously, the front and rear pieces are cast, and will go out for re-chroming, and the joining center piece I will have re-plated.


So at this point I'm still (only!) down to this:


Need to keep moving!